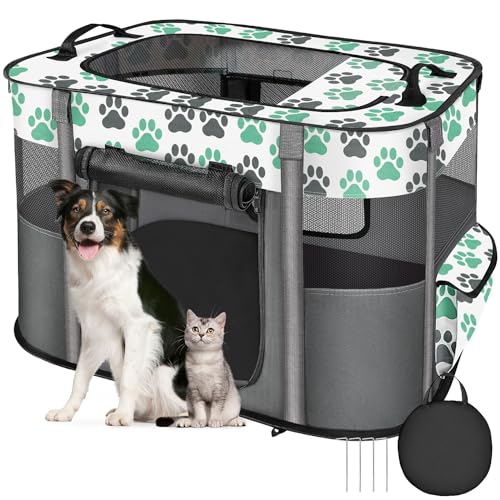
Introduction: In this section, we delve into the art of constructing a safe and comfortable space for our furry friends. The focus is on creating an environment that not only meets their basic needs but also ensures their safety and well-being. This guide will walk you through the essential steps and considerations involved in setting up a robust and functional shelter for your pet.
Understanding the Basics: Before we begin, it’s crucial to understand the fundamental requirements of a good pet enclosure. This involves selecting the right materials and design that can withstand various weather conditions and provide adequate space for your pet to move around freely. The structure should be sturdy enough to protect your pet from external threats while also being comfortable enough to serve as a cozy retreat.
Choosing the appropriate materials is the first step in this process. We will explore various options, highlighting their pros and cons, to help you make an informed decision. Additionally, we will discuss the importance of proper sizing and ventilation to ensure your pet’s health and happiness.
By the end of this guide, you will have a clear blueprint on how to erect a reliable and efficient pet shelter, tailored to meet the unique needs of your beloved companion.
Materials and Tools Required
In this section, we will outline the essential components and equipment necessary for constructing a secure and durable enclosure for your pet. Understanding the materials and tools beforehand will ensure a smooth and efficient process.
Essential Materials
Framework: Robust metal poles are crucial for the structural integrity of the enclosure. Ensure they are galvanized to resist rust and corrosion.
Mesh Fabric: A sturdy woven material that provides the primary barrier. It should be durable enough to withstand wear from your pet.
Fasteners: Various types of clips and ties are needed to securely attach the mesh fabric to the framework. Choose ones that are both strong and weather-resistant.
Gate Hardware: This includes hinges and a latch system to ensure the entrance is secure and easy to operate.
Key Tools
Measuring Tape: Essential for accurate measurements during the layout and assembly stages.
Drill: Useful for making holes and securing fasteners. Ensure it is suitable for the materials being used.
Pliers: These will be handy for manipulating and tightening the fasteners.
Hammer: Necessary for setting poles and driving stakes if needed.
Having these materials and tools at hand will greatly facilitate the construction process, ensuring a safe and comfortable space for your pet.
Designing the Kennel Layout
In this section, we delve into the strategic planning of the enclosure’s arrangement. The primary goal is to ensure functionality and comfort, tailored to the resident’s needs. By thoughtfully considering the space and its components, we aim to create an environment that is both secure and inviting.
Assessing Space Requirements
The first step in crafting the layout is to evaluate the available area. This involves determining the optimal size for the resident’s comfort and movement. Consider the full range of activities the resident might engage in, from rest to play, and allocate space accordingly. It’s crucial to balance the expanse with the practicalities of maintenance and accessibility.
Zoning the Area
Dividing the enclosure into distinct zones enhances its utility. A resting area should be secluded and shielded from elements, while a play zone should be spacious and clear of obstructions. Additionally, a feeding station should be positioned away from high-traffic areas to maintain cleanliness and order.
Incorporating Natural Elements
To enrich the resident’s experience, integrate elements that mimic their natural habitat. This could include soft ground cover for comfort, shaded areas for respite from the sun, and perhaps a few shrubs or trees for aesthetic appeal and additional shelter. These elements not only enhance the enclosure’s visual appeal but also contribute to the resident’s well-being.
Ensuring Safety and Security
Safety is paramount in the design. Ensure that all materials are durable and that the structure is robust enough to withstand weather conditions and resident’s activity. Gates and entry points should be secure, with mechanisms that prevent accidental escapes or intrusions. Regular inspections and maintenance are essential to uphold these safety standards.
By meticulously planning the layout, we not only meet the basic needs of the resident but also create a space that fosters a sense of belonging and contentment. This thoughtful approach ensures that the enclosure serves as a haven, providing both comfort and security.
Constructing the Foundation
In this section, we delve into the crucial step of establishing a robust base for our structure. Ensuring a solid foundation is essential for the durability and stability of the entire setup. We will explore various methods and materials that can be employed to achieve this.
To begin with, selecting the right location is paramount. Choose a spot that is level and well-drained to prevent water accumulation. This not only enhances the longevity of the structure but also ensures a comfortable environment for its inhabitants.
- **Preparation of the Site**: Clear the area of any debris, rocks, or vegetation. This step is crucial for maintaining a flat surface and preventing any unevenness that could compromise the integrity of the foundation.
- **Choosing the Right Materials**: Depending on your local climate and soil conditions, you might opt for concrete slabs, gravel, or treated wood as the base material. Each option has its own set of advantages and should be chosen based on specific needs and environmental factors.
- **Laying the Foundation**: If concrete is your choice, ensure it is poured evenly and allowed to cure properly. For a gravel base, compact the gravel to create a stable surface. Wood foundations should be treated to withstand moisture and rot.
Additionally, consider incorporating a slight slope into your foundation design to facilitate water runoff. This simple yet effective measure can significantly enhance the drainage capabilities of your structure, preventing waterlogging and related issues.
By meticulously constructing the foundation, you lay the groundwork for a sturdy and reliable structure that will serve its purpose effectively for years to come.
Assembling the Metal Mesh Barrier
In this section, we will delve into the process of putting together the metal mesh barrier, which is a crucial step in constructing a secure enclosure for our furry friends. This guide will provide detailed instructions on how to efficiently assemble the components, ensuring a sturdy and reliable structure.
To begin, gather all necessary materials and tools. These typically include:
- Metal mesh rolls
- Posts for support
- Fasteners such as clips and ties
- Measuring tape
- Pliers and a wrench
- Hammer or a post driver
First, determine the perimeter of your enclosure. Use the measuring tape to mark the exact dimensions on the ground. This will guide you in positioning the support posts correctly.
Next, install the support posts. These should be placed at the corners and intervals along the perimeter. Ensure they are firmly embedded in the ground to provide stability to the barrier. Use a hammer or a post driver to secure them in place.
Once the posts are in position, unroll the metal mesh along the marked lines. Start from one corner and stretch it to the next post. Use clips or ties to attach the mesh to the posts, making sure it is taut and secure. Repeat this process along the entire perimeter.
For added strength, consider installing horizontal support wires that run along the length of the mesh. These can be attached to the posts and help in maintaining the integrity of the barrier.
Finally, inspect the entire structure to ensure all components are securely fastened and the barrier is sturdy. Adjust any loose parts using pliers or a wrench.
By following these steps, you will have successfully assembled the metal mesh barrier, ready to serve as a protective enclosure for your pets.
Finishing Touches and Maintenance
As we approach the completion of our pet enclosure, it’s crucial to focus on the final details and long-term upkeep to ensure the space remains safe and comfortable for our furry friends. This section will guide you through enhancing the functionality and aesthetics of the structure, as well as maintaining it for durability and safety.
Enhancing Aesthetics and Functionality
To make the space more inviting and functional, consider adding a weather-resistant roof to shield from harsh elements. Additionally, installing a secure gate with a latch that is out of reach of pets can enhance security. For comfort, a layer of soft bedding or artificial grass can be laid down inside the enclosure, providing a cozy resting area.
Ongoing Care and Upkeep
Regular inspection and maintenance are essential to keep the enclosure in top condition. Check for any loose or damaged parts and tighten or replace them as necessary. Cleaning the area regularly, including the removal of waste and washing down surfaces, will help maintain hygiene and prevent the buildup of bacteria or pests. Remember to also check the integrity of the locking mechanisms on the gate to ensure your pet’s safety at all times.


