
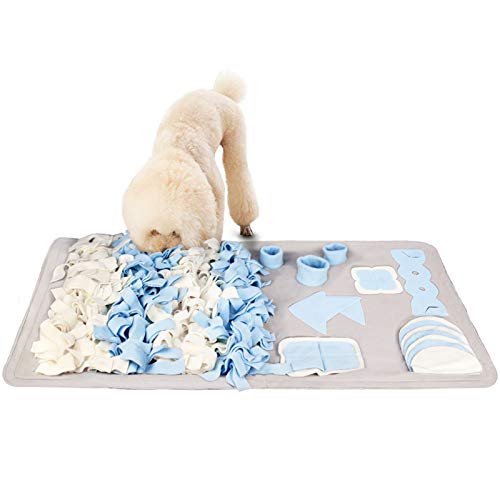


For a fun and stimulating activity, consider crafting a sensory play area using fabric and basic supplies. This engaging project is perfect for keeping your furry friend entertained while encouraging natural foraging behaviours. The materials needed are simple: strips of soft fabric, a sturdy base, and some hidden treats to spark your pet’s curiosity.
Begin by cutting various fabric pieces into strips. The textures and colours will not only capture your pet’s attention but also provide a tactile experience. Attaching these strips to a base, like a mat or sturdy board, allows for a safe and structured play environment. Ensure the fabric is securely fastened to withstand enthusiastic digging and sniffing.
Once the pieces are in place, hide treats within the folds and crevices. This turns playtime into a rewarding adventure, encouraging your companion to use their nose and paws to uncover hidden treasures. Observe as they engage with the creation, watching their excitement grow with each discovery.
Over time, you’ll notice improvements in your pet’s problem-solving skills and overall happiness. Share in the joy of watching them interact with this personalised puzzle, making it a delightful addition to your pet care routine.
Creating a Canine Foraging Tool
Begin with a sturdy base, like a piece of non-slip rubber matting or an old towel. This ensures stability while your furry friend explores the hidden treats.
Select a variety of fabric strips; fleece works well due to its softness and durability. Cut these into pieces roughly 1 inch wide and 6 to 8 inches long.
- Choose different colours to make it visually stimulating.
- Ensure the strips are frayed at the ends to create more hiding spots.
Next, tie the fabric pieces to the base. Start from one end, pulling the fabric through holes or loops in the mat. Make sure to space them out, allowing enough room for treats to be concealed.
- Continue adding strips until the surface is well covered.
- Test the durability by tugging on the fabric to ensure it’s securely attached.
Once complete, scatter some kibble or your pet’s favourite snacks within the folds. This encourages natural foraging behaviour, stimulating both mind and body.
For added interest, consider integrating different textures using materials like cotton or burlap. This variety keeps your companion engaged over time.
Regularly clean the creation by shaking out debris and washing it as needed, ensuring it remains a safe and fun environment.
As you enjoy this activity, don’t forget to check out this interesting article on how big can termites get for some fun trivia!
Choosing the Right Materials for Your Snuffle Mat
Selecting appropriate materials is critical for creating an engaging enrichment tool for your furry companion. Look for durable, non-toxic fabrics to ensure safety during play. Fleece is a popular choice due to its softness and resistance to fraying. It’s also easy to clean, which is a bonus for any pet owner.
Consider using a sturdy base like a rubber mat or durable canvas. This provides a solid foundation and prevents slipping while your pet sniffs and searches. The base should be heavy enough to stay in place but flexible enough to accommodate various textures and additions.
| Material | Pros | Cons |
|---|---|---|
| Fleece | Soft, durable, easy to clean | Can pill over time |
| Canvas | Strong, stable base | Less soft, may not be as comfortable |
| Rubber mat | Non-slip, easy to secure | May not provide as much texture |
Incorporating various textures adds interest. You could mix in materials like cotton, burlap, or even old towels. These variations will stimulate your pet’s senses and keep them engaged. Just ensure all materials are machine washable or easy to clean to maintain hygiene.
Step-by-step guide to assembling the snuffle mat
First, grab your base fabric. Cut it into a rectangle, around 60×40 cm. This size works well for various breeds. Make sure to secure the edges to prevent fraying. You can use pinking shears for a neater finish.
Next, cut your chosen fleece into strips. Aim for 2-3 cm wide and about 30 cm long. The number of strips will depend on how densely you want to fill the surface. I usually prepare around 50-70 strips for a good mix.
Once you have your strips ready, start attaching them to the base. Fold each strip in half, then pull the ends through the fabric to create a loop. Secure them tightly, spacing them closely together. This ensures there are plenty of hiding spots for treats.
Continue this process until the entire surface is filled. If you want to add extra texture, consider mixing different colours or patterns in your fabric strips. It not only looks appealing but also stimulates your pet’s interest.
After you’ve filled the entire area, check for any loose ends or gaps. Make sure everything is secured and tidy. You can also add a non-slip backing to the underside to prevent movement during use.
Finally, give it a good shake and lay it flat. Introduce it to your furry companion by hiding a few treats within the folds, and watch them engage in a fun and rewarding activity. Enjoy the moments of joy and focus as they explore their new toy!
Tips for Securing the Mat to Prevent Slipping
To keep your creation stable during playtime, attach a non-slip rubber backing or use a non-slip rug pad underneath. This provides grip on various surfaces, minimising any sliding. For extra security, consider sewing or gluing the edges of the fabric to the backing material. This adds durability and reduces movement.
Another effective technique is to use Velcro strips on the bottom. Stick one side to the underside of your creation and the other to the floor. This allows for easy removal when cleaning while ensuring it stays in place during use.
Choosing the Right Location
Placing the item on a flat surface can greatly reduce any potential slipping. Avoid areas with high foot traffic or inclines. If your furry friend enjoys playing in specific spots, ensure those areas are well-suited for stability.
Regular Maintenance
Keep the materials clean and free from debris. Regularly check for wear and tear, as damaged areas can lead to slippage. Consider using a vacuum for easy cleaning. Plus, feeding your pet the best dog food with fish oil for dry skin can help improve their coat, reducing shedding and keeping the area tidy.
Best practices for introducing your furry friend to the enrichment mat
Start slowly. Allow your pet to explore the new item without any pressure. Place it on the floor and let them sniff and investigate at their own pace. This approach builds curiosity and comfort.
Positive reinforcement
Use treats or favourite toys to encourage engagement. Hide a few goodies within the fabric strips to spark interest. The excitement of finding hidden treasures will motivate them to interact more.
Short sessions
Initially, keep the exploration time brief. A few minutes is sufficient to avoid overwhelming them. Gradually increase the duration as they become more familiar with the setup. Pay attention to their reactions; if they seem disinterested, reduce the time or try different hiding spots for the treats.
Always supervise interactions. This not only ensures their safety but also allows you to observe their behaviour. If they show signs of frustration or boredom, adjust the difficulty of the challenge to keep it enjoyable.
Cleaning and Maintaining Your Canine Enrichment Tool
Regularly cleaning your enrichment tool is vital for your pet’s health. I recommend shaking it out after each use to remove any crumbs or debris that might accumulate. This simple step keeps the fabric fresh and ready for the next play session.
For a deeper clean, machine wash the fabric pieces on a gentle cycle using mild detergent. Avoid harsh chemicals that could irritate your pet’s skin. After washing, air dry the pieces completely to prevent any mildew from forming.
If your creation features non-fabric elements, such as rubber or plastic, wipe them down with a damp cloth and a pet-safe cleaner. This ensures that all surfaces remain hygienic.
Inspect the item frequently for wear and tear. If you notice any loose parts or fraying fabric, take the time to repair or replace those sections. Keeping everything in good condition prevents any choking hazards and prolongs the life of your enrichment tool.
Storing the item in a cool, dry place helps maintain its integrity. Avoid direct sunlight, as this can fade colours and weaken materials over time.
Lastly, I found it helpful to rotate the use of various enrichment tools to keep my furry friend engaged. This not only prevents boredom but also allows for different cleaning schedules, ensuring everything stays fresh and appealing.
Customising the Mat for Different Sizes and Behaviours
To tailor the feeding accessory for varying sizes of canines, consider the length and thickness of the fabric strips. For smaller breeds, opt for shorter, thinner pieces that allow them to easily sniff and forage. Larger breeds, on the other hand, benefit from longer, bulkier strips that create more challenging hiding spots for treats, keeping them engaged.
Adjusting for Activity Levels
For highly energetic pets, incorporate a mix of textures and materials. Using rougher fabrics can stimulate their senses more effectively and encourage longer play sessions. If your furry friend tends to be more laid-back, softer fabrics may be more appealing, allowing them to explore without feeling overwhelmed. Experimentation is key to finding the right balance.
Incorporating Behavioural Needs
Observe your companion’s foraging style. If they tend to be more aggressive, enhance durability by using tougher materials that withstand vigorous digging. Conversely, for gentler foragers, focus on softer, more inviting options. Adding hidden compartments or pockets can also cater to different digging habits, ensuring that all canines, regardless of behaviour, find joy in their new plaything.
Don’t forget to rotate the treats and obstacles regularly. This keeps the experience fresh and challenging, catering to the specific needs and behaviours of your beloved pet.


