


Begin with a solid foundation: gather your ingredients. You’ll need icing sugar, glucose syrup, and a splash of water. This combination forms the base of your delightful creation. Aim for a smooth, pliable consistency that can be easily shaped into any breed you fancy.
Next, consider colour. Use food dye to transform your mixture into the desired hue. Whether it’s a playful pup with a golden coat or a sleek black companion, the choice is yours. Just remember to add colour gradually for the best results.
Once you achieve the right shade, it’s time for the fun part–sculpting! Roll out your mixture to the right thickness, then use a variety of tools for shaping ears, tails, and paws. A simple knife can create fur textures, while small cutters can help form distinct features like eyes and noses.

Lastly, bring your four-legged friend to life. Assemble the parts with a dab of water or edible glue to keep everything secure. Take a moment to step back and admire your handiwork. Each detail, from the tiny collar to the playful expression, adds character to your sweet creation.
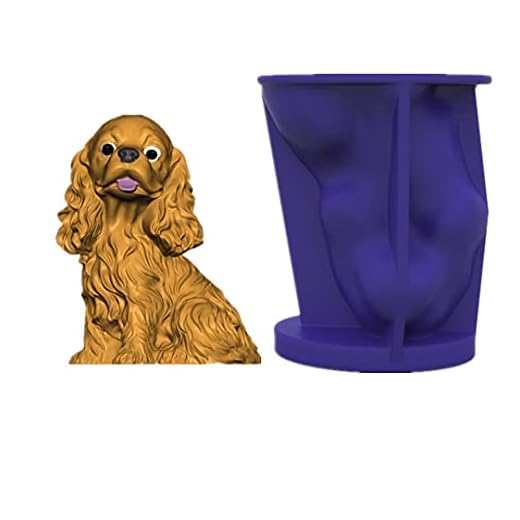
Creating a Canine Figurine with Edible Modelling Material
Begin with a solid foundation by choosing the right type of fondant. Opt for a quality product that is pliable yet firm enough to hold its shape. A good ratio of sugar to glucose syrup ensures the mixture remains workable without being too sticky.
Required Materials
- Edible modelling material
- Food colourings
- Rolling pin
- Sharp knife or fondant tools
- Edible glue or water
- Cornstarch (for dusting)
Steps to Follow
- Begin by kneading the modelling material until it becomes soft and pliable.
- Roll out a portion to form the body. Shape it into a barrel-like form for the torso.
- Create four smaller pieces for the legs. Ensure they are proportionate to the body.
- Attach the legs to the torso using edible glue or water for better adhesion.
- Form a head by rolling a ball and shaping it into a muzzle. Attach it to the body.
- Add ears by rolling out two flat pieces and attaching them to the head.
- Use smaller pieces for the tail and any additional features like eyes and a nose.
- Paint with food colourings to add details. A brush can help create realistic textures.
As you craft this delightful figure, remember that the end product can serve not just as a decoration but also as a tasty treat. If your furry friend is facing digestive issues, consider checking out the best foods for dogs with diarrhea to ensure their health is a priority while you indulge in your creative pursuits.
Choosing the Right Ingredients for Your Edible Craft
Opt for high-quality icing sugar as the base. This ensures a smooth texture and easy handling. Look for finely sifted varieties to avoid any gritty feel.
Incorporate a good amount of glucose syrup. It adds flexibility and helps prevent cracking while keeping your creation moist. This ingredient is non-negotiable for a pliable result.
Additional Components
Add a small quantity of tylose powder or CMC to enhance firmness. This is particularly useful for intricate designs, as it provides support without compromising on taste.
Consider flavourings as well. Vanilla extract or almond essence can elevate the overall experience and make your edible masterpiece more enjoyable.
Colouring Your Creation
Use gel food colours for tinting. They blend seamlessly and yield vibrant shades without altering the consistency. Avoid liquid dyes, as they can introduce unwanted moisture.
Always ensure your ingredients are at room temperature before mixing. This helps achieve a smooth consistency and prevents lumps from forming during the process.
Step-by-step guide to preparing fondant
First, gather the necessary components: icing sugar, glucose syrup, and glycerin. Use a clean, flat surface for mixing. Sift 500 grams of icing sugar into a bowl to eliminate lumps.
In a separate bowl, combine 60 ml of glucose syrup and 15 ml of glycerin. Warm this mixture slightly in the microwave for about 10 seconds. This softens the syrup and makes it easier to blend.
Gradually pour the warm syrup into the icing sugar, mixing with a spatula until it starts to come together. Once it resembles a shaggy dough, knead it with your hands. Dust your work surface with a bit of icing sugar to prevent sticking.
Continue kneading until the mixture is smooth and pliable, typically around 5 to 10 minutes. If it feels too sticky, add a little more icing sugar. If it’s too dry, a few drops of water can help achieve the right consistency.
Wrap the finished product in cling film to keep it from drying out. Allow it to rest for at least 30 minutes before using. This resting period enhances its stretchability, making it easier to work with.
For tips on other culinary techniques, check out this guide on how to cook cod fillets in skillet.
Shaping the Body and Limbs of Your Canine Creation
To form the body and legs of your furry figure, start with a central ball of fondant. This will represent the torso. Aim for a size that feels proportionate to the limbs you’re about to attach.
Follow these steps for a well-structured physique:
- Torso: Roll the ball into an oval shape, slightly flattening one side. This will be the base where the legs will connect.
- Legs: For each leg, take smaller pieces of the paste. Roll them into cylinders, tapering one end for the paws. Secure them by inserting them into the body’s underside.
- Paws: Create small discs for the paws. Gently press them onto the ends of each leg, adding a bit of water as adhesive if necessary.
- Tail: Roll out a thin piece for the tail. Shape it as desired, whether straight, curled, or wagging. Attach it to the rear of the body.
- Neck: Form a slightly thicker piece for the neck. Attach it to the torso and smooth the connection point for a seamless look.
For a more realistic appearance:
- Add texture to the legs by gently pressing with a tool or your fingers.
- Consider using different shades of paste for a more lifelike colour.
- Experiment with proportions; some breeds have shorter legs or longer bodies.
Take your time with each step, ensuring everything feels balanced. The more attention you give to the shaping, the more lifelike your creation will appear. Enjoy the process and let your imagination guide you!
Adding details: eyes, nose, and ears
To bring your canine creation to life, focus on the features that capture personality: the eyes, nose, and ears. Start with the eyes, as they are the windows to expression. Use small balls of black paste for pupils, and add a tiny dot of white for a glimmer. This will give a lively look. Shape the whites of the eyes from a thin layer of white paste, placing the black pupils within them.

Next, for the nose, form a small, rounded piece from dark paste. Flatten it slightly, ensuring it has a smooth texture. To add realism, create nostrils by gently pressing with a toothpick or a similar tool. This will give depth and detail to the snout.
When crafting the ears, consider the breed you’re aiming to replicate. For floppy ears, roll out two oval shapes, tapering them at one end. For pointy ears, create triangles with a slight curve. Attach them securely to the head, ensuring they blend well with the overall shape. Use a bit of water or edible glue for adhesion.
| Feature | Materials | Technique |
|---|---|---|
| Eyes | Black and white paste | Shape pupils and whites, add highlights |
| Nose | Dark paste | Form, flatten, and add nostrils |
| Ears | Paste for desired breed | Shape and attach, ensuring proper placement |
These details will enhance the character of your edible companion, making it truly unique. Pay attention to proportions and placement to ensure everything looks harmonious. Each feature contributes to the overall charm, so take your time with these finishing touches.
Techniques for Colouring and Decorating Your Edible Canine Creation
Start with gel food colours for rich, bold hues. These pigments mix seamlessly into fondant, allowing for precise colour control. Use a toothpick to add colour gradually, ensuring you achieve the desired shade without overwhelming the mixture.

Creating Realistic Fur Effects
To mimic the texture of fur, consider using a small brush or a clean toothbrush. Lightly drag the bristles across the surface of your creation after applying a base coat. This technique gives depth and realism to the fur, enhancing the overall appearance.
Adding Personality with Accessories
Enhance character by crafting tiny accessories. Use contrasting colours for collars, bows, or even little hats. Edible glitter can add a whimsical touch, making your creation stand out. For details like spots or stripes, use a fine piping tool for precision.
For finishing touches, dust the surface with edible shimmer powder. This adds a soft glow, making your edible masterpiece truly eye-catching. A few strategically placed details can transform a simple figure into an impressive work of art.
Tips for Storing and Displaying Your Edible Creation
To maintain the freshness of your edible masterpiece, keep it in an airtight container. This prevents moisture from ruining the texture and keeps it looking its best. If you have room, a cool, dry place away from direct sunlight is ideal for storage. Avoid the fridge as the humidity can cause it to sweat and lose its shape.
Displaying Your Artwork
For showcasing your creation, consider using a sturdy base like a cake board. It not only provides stability but also enhances the visual appeal. If you want to add a touch of charm, use decorative elements like flowers or themed props around it. Just ensure they complement the overall look without overpowering your crafted figure.
Longevity Tips
If you want your creation to last longer, consider using a food-safe sealant. This can help preserve the colours and details, making it a delightful display piece for months. Be mindful, though, that while it can enhance durability, it may alter the texture slightly, so use sparingly. Lastly, always handle with care to avoid any accidental damage.

Common mistakes to avoid when crafting a canine figure from fondant
One of the biggest blunders is not allowing the modelling material to rest before use. This step is crucial; it helps achieve the right consistency and prevents cracking during shaping. Always knead the mixture until it’s smooth, then let it sit for a while.
Another frequent error is neglecting to use cornstarch or icing sugar for dusting your working surface. This prevents sticking, allowing for smoother manipulation. Skipping this can lead to frustration as the material clings to your hands or tools.
Pay attention to proportions while forming the body and limbs. Making one leg significantly thicker or thinner than the others can result in an unbalanced appearance. Use a scale or measuring tools to ensure uniformity.
Details matter. Failing to carve or define features like the snout or paws can make the figure appear flat. Use a modelling tool to add texture; this adds depth and realism.
Don’t forget about drying time. Rushing the process can lead to deformation. If you’re working on a larger piece, consider allowing segments to set individually before assembling them.
When it comes to colours, mixing them improperly can lead to unwanted shades. Always start with a small amount and gradually add more until you achieve the desired hue. Test the colour on a small piece to avoid wasting material.
Lastly, improper storage can ruin your hard work. Ensure the finished item is kept in a cool, dry place, away from direct sunlight. If you need to stack items, use parchment paper to prevent them from sticking together.


