


Absolutely, incorporating a canine access point into a metal entryway is feasible. However, several factors require consideration to ensure a successful installation. The first step involves selecting the right type of access point designed for metal structures, as not all models are suited for such materials. Look for options specifically labelled for metal or heavy-duty usage, which often come with additional support features.
Before commencing with the modification, gather the necessary tools: a metal cutting saw, drill, and appropriate screws. It’s essential to measure accurately, marking the position carefully to avoid mistakes. Once the area is outlined, cutting through the metal requires caution. Using a jigsaw or reciprocating saw equipped with metal-cutting blades can facilitate this process, as those tools are designed to handle tougher materials.
After creating the opening, installing the access mechanism follows. This typically involves placing the frame into the cut section and securing it properly. Make sure to use weatherproof seals to prevent drafts and water ingress. Additionally, reinforce the edges if needed, ensuring durability and safety against wear and tear.

Lastly, consider the location of this entryway. Positioning it at a convenient height for your pet will enhance usability. It’s a great way to provide your furry friend with independence while maintaining home security. With careful planning and execution, this enhancement can significantly improve both your and your pet’s quality of life.
Choosing the Right Canine Access Point for Metal Entrances
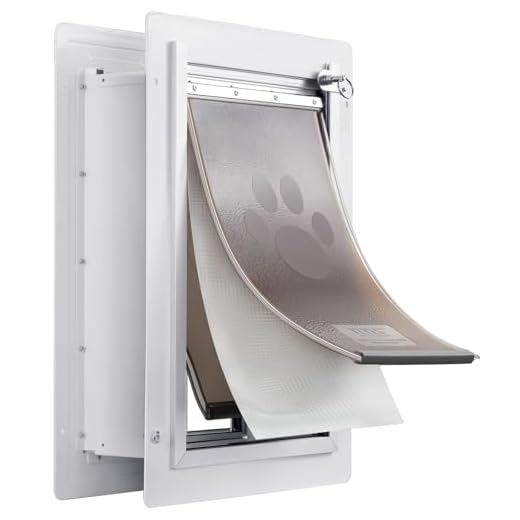
For those looking to install an access point for their canine companions in a metal entrance, focus on choosing a model specifically designed for such materials. Select a unit with a robust frame and a reliable locking mechanism to ensure security and durability.
Material Compatibility
Opt for a product constructed from high-quality materials like reinforced plastic or aluminium. These will withstand wear and tear, providing longevity. Ensure that the product’s dimensions align with the size of your furry friend; a snug fit prevents cold drafts and unwanted pests from entering.
Installation Tips
When ready to install, use a high-speed drill with metal-cutting bits for a clean cut. Follow the manufacturer’s guidelines carefully, as some models may require additional reinforcements. A proper seal around the edges will enhance insulation, making it a comfortable space for your pet.
Tools and Materials Needed for Installation
To successfully install a pet flap in a metal entryway, gather the following tools and materials beforehand. This preparation helps streamline the process and ensures a more efficient experience.
Tools
- Power drill with metal drill bits
- Jigsaw or reciprocating saw
- Measuring tape
- Level
- Marker or pencil
- Safety goggles
- Gloves
Materials
- Pet flap kit designed for metal surfaces
- Sealant or weather stripping
- Metal screws (ensure they’re compatible with the chosen flap)
- Paint or finish (optional, for aesthetics)
Having these items at hand will make the installation process smoother, allowing for a precise fit and secure placement. Always prioritise safety by wearing protective gear while working with power tools and cutting materials.
Step-by-Step Guide to Cutting a Steel Panel
To create an opening in a metal entryway, follow these precise steps for a successful modification.
Preparation
- Gather necessary materials: protective goggles, gloves, measuring tape, marker, straight edge, and a jigsaw with metal-cutting blades.
- Ensure area is clear of obstructions and distractions.
- Mark the desired dimensions on the surface using a marker and straight edge to ensure accuracy.
Cutting Process
- Put on safety goggles and gloves for protection against metal shards.
- Using the jigsaw, start at one corner of the marked outline. Maintain a steady, controlled speed to ensure a clean cut.
- Follow the marked line closely. If necessary, adjust your grip or stance to maintain control.
- Once the cut is complete, remove any sharp edges with a metal file to prevent injuries.
- Clean the area, ensuring no debris remains that could pose a hazard.
With these steps, creating an opening in a metal panel becomes a manageable task. Always prioritise safety and take your time to achieve the best results.
Safety Considerations During Installation
Prioritise safety throughout the installation process. Always wear appropriate protective gear such as gloves, safety goggles, and ear protection. The use of power tools can lead to accidents, so ensure you are comfortable with all equipment before starting the task.
Workspace Preparation
Clear the area around your workspace. Remove any obstacles that could cause trips or distractions. A clean environment will minimise risks and improve focus. If possible, work outdoors or in a well-ventilated area to avoid breathing in metal shavings or dust.
Handling Metal Safely
When cutting through metal, sharp edges will be exposed. Use caution when handling the cut material. Store any removed sections away from your work area to prevent accidental cuts. It’s also wise to have a first-aid kit nearby, just in case of minor injuries.
| Safety Gear | Purpose |
|---|---|
| Gloves | Protect hands from sharp edges |
| Safety Goggles | Shield eyes from metal fragments |
| Ear Protection | Reduce noise from power tools |
Lastly, consider your pet’s safety. Keep them away from the workspace during the process. This ensures their safety and allows you to concentrate fully on the task. Once the installation is complete, ensure that everything is secure before allowing them access. For a happy and healthy pet, check out the best dog foods for dalmatian.
Sealing and Insulating the Dog Door Properly
To ensure a tight seal around the opening, use weatherstripping made from foam or rubber. This material will help prevent drafts and keep the temperature consistent inside your home. Measure the dimensions of the flap and cut the weatherstripping accordingly, applying it to the edges of the frame before installation.
For additional insulation, consider using magnetic strips. These can be installed along the perimeter of the flap, enhancing the closure and reducing heat loss. The magnetic seal not only improves energy efficiency but also makes it easier for pets to enter and exit without leaving a significant gap.
After securing the flap, test for any gaps by running your hand along the edges. If you feel air coming through, adjust the weatherstripping or add more insulation as needed. Remember, a well-sealed entry will help maintain your home’s comfort and lower heating or cooling costs.
Lastly, periodically check the integrity of the seals and insulation. Over time, wear and tear can compromise their effectiveness. Regular maintenance will ensure that the installation remains functional and energy-efficient, providing comfort for both you and your furry friend.