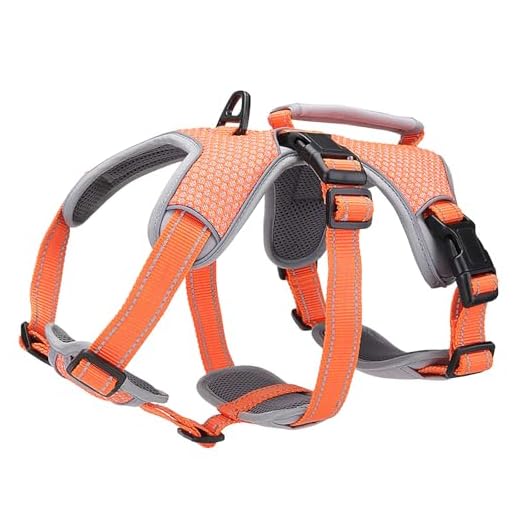


Begin by laying out all components in front of you. It helps to have a clear view of what needs to be connected. The typical setup includes straps, a chest piece, and a back clip. Familiarise yourself with each part to avoid confusion later.
Next, take the chest piece and position it correctly on your pet. Ensure the padded section sits comfortably against their body, preventing any chafing. Adjust the straps to fit snugly but not too tight. You should be able to slide two fingers between the material and their fur. This balance is key for comfort and security.
After securing the front, connect the back clip. This section usually attaches near the base of the spine, providing stability during walks. Again, check the fit; it should be firm yet allow for movement. A well-fitted system enhances control without causing distress.
Once everything is attached, take a moment for a final check. Ensure all clips are fastened and the straps are evenly distributed. A quick walk around your space will help assess if adjustments are needed. Your furry friend’s comfort and safety are paramount, so don’t rush this step.
Assembling the Canine Support System
Begin with the straps laid out flat. It’s easier to see which part connects where. Identify the front piece, usually shaped to fit around the chest, and the back piece, which often has a clip for the leash. Make sure the attachment points are oriented correctly; this is key for comfort and safety.
Connecting the Straps
Take the front section and align it with the back. The straps should cross over the dog’s back, creating a secure loop. Slide the chest strap through the designated loop on the back piece. This will create a snug fit without restricting movement. Adjust the length of the straps as necessary to ensure a comfortable yet secure fit.

Final Adjustments
Once assembled, place it on your furry friend and check the fit. You should be able to slide two fingers between the harness and their body. If it’s too loose, tighten the adjustments. If it’s too tight, loosen them slightly. Always double-check that the clips are securely fastened before heading out.
| Step | Action |
|---|---|
| 1 | Lay out straps flat |
| 2 | Identify front and back pieces |
| 3 | Connect front to back through the loops |
| 4 | Adjust for comfort |
| 5 | Test fit on your pet |
Selecting the Right Harness for Your Canine Companion
Choose a model that fits snugly but allows for comfortable movement. Measure your pet’s girth around the widest part of their ribcage to find the ideal size. Many brands offer sizing charts, so keep that handy when shopping.
If your furry friend tends to pull, look for a no-pull design with front-clip options. These help redirect their attention back to you during walks. For small breeds, lightweight materials are key; look for breathable fabrics that won’t weigh them down.
Consider Activity Level
For active canines, opt for a harness that has padding and adjustable straps. This ensures a secure fit during adventures. If you enjoy hiking or running, consider reflective elements for visibility in low light.
Special Needs and Breeds
Some breeds may require specific designs. For instance, short-nosed breeds benefit from a front-clip harness to avoid pressure on their throats. Older pets or those with mobility issues may need a support harness that offers extra help getting up or navigating stairs.
Always test the product before committing. Let your pet wear it indoors for a while to see how they react. If they seem comfortable and can move freely, you’ve likely found the right option!
Understanding the Components of a Canine Restraint System
Familiarising oneself with the key elements of a canine restraint system is essential for both comfort and safety. Each component plays a role in ensuring that the fit is secure and the experience is pleasant for your furry friend. Let’s break down these parts.
Straps and Adjustments
Straps are the backbone of any restraint system. They should be made from durable materials that withstand wear and tear. Look for adjustable straps to ensure a snug fit. When I first got my Labrador, I found that adjusting the straps to fit his growing frame was necessary. The ability to modify the fit allows for comfort and prevents chafing during walks.
Fasteners and Connection Points
The fasteners, often clips or buckles, need to be easy to use yet secure. I recommend trying out different types to see which ones you find most user-friendly. Connection points for leads should be sturdy and well-placed. My first experience with a cheap clip ended with my pup escaping during a walk, so investing in reliable fasteners is a must. A well-designed restraint will have multiple connection points, offering versatility for different activities.
Adjusting the Harness for a Comfortable Fit
Begin by placing the contraption on your furry friend and ensuring it sits correctly on their body. The fit should be snug but not restrictive. Aim for enough space to slide two fingers between the material and your pet’s skin. This ensures comfort without the risk of chafing.
Straps and Adjustments
Take a close look at the straps. Each should be adjustable; modify them slowly until you find the right fit. Focus on the chest and belly straps first, as these areas are crucial for stability. If your canine buddy pulls on walks, a tighter fit might be necessary, but avoid making it so tight that it hinders their movement.
Final Checks
Once adjustments are made, allow your companion to walk around. Observe their behaviour; a relaxed dog indicates satisfaction. If they seem uneasy or try to scratch at the gear, revisit the adjustments. Remember, a well-fitted harness can enhance your outings together. For a well-rounded understanding of pet care, check out this informative article on why cant dogs have human food.
Securing the Harness Properly on Your Canine Companion
Start by ensuring the straps are snug but not too tight. You should be able to fit two fingers between the material and your pet’s skin. This prevents chafing while providing a secure fit during walks.
Steps to Secure the Gear
- Position the apparatus correctly over the back and chest.
- Fasten all clips and straps, checking that each section is aligned properly.
- Adjust the straps to eliminate excess slack without restricting movement.
- Perform a final check by gently pulling on the straps to ensure they hold firm.
Monitoring for Comfort
- Observe your pet’s behaviour. If they seem uncomfortable or try to wriggle free, reevaluate the adjustments.
- Take short walks initially to allow your furry friend to get used to the feeling of the new setup.
- Inspect the fit regularly, especially after adjustments or if your companion gains or loses weight.
After a few outings, you’ll be able to tell if the fit is just right. A well-fitted setup will keep your pal comfortable and secure, making adventures more enjoyable for both of you.
Testing the Harness for Safety and Functionality
Before taking your canine companion out for a stroll, it’s crucial to ensure the gear is secure and functional. Here’s a straightforward checklist to assess the setup:
- Check for Fit: Adjust the straps to prevent slipping. The fit should be snug but not restrictive. There should be enough space to fit two fingers between the material and your pet’s body.
- Inspect the Clips and Buckles: Examine all fastening mechanisms for any signs of wear or damage. They should lock securely and release easily without excessive force.
- Examine the Material: Look for fraying or tears in the fabric. A robust material will withstand pulling and wear during walks. Nylon or polyester options are often best.
- Test the D-Ring: Attach a leash and give it a gentle tug. The D-ring should stay secure without bending or moving. It’s the primary attachment point, so safety here is paramount.
- Observe Your Pet’s Movement: After securing the gear, encourage your furry friend to walk around. Watch for signs of discomfort or restrictions in movement. They should be able to walk, sit, and lie down comfortably.
During initial outings, keep sessions short to allow your pet to acclimatise. Pay attention to their behaviour–if they seem restless or try to escape, reassess the fit and comfort. After a couple of walks, evaluate the setup again; wear and tear can occur quickly.
Lastly, always practice a few quick commands while on the move to ensure the connection remains stable and your companion is responsive. Regular checks will help maintain safety and functionality, creating a joyful experience for both of you.